

Mastering Mini Splits: A DIY Guide to Seamless Installation


Why Mini Split Installation Has Become a Popular DIY Project
Mini split installation is gaining popularity among homeowners who want efficient heating and cooling without the complexity of ductwork. These ductless systems offer zone-controlled comfort and can significantly reduce energy bills compared to traditional HVAC systems.
Quick Answer for Mini Split Installation:
- Plan your system - Choose single-zone or multi-zone based on your needs
- Mount the indoor unit - Secure the mounting bracket to wall studs at least 6 feet high
- Install the outdoor unit - Place on level concrete pad or wall bracket with proper clearance
- Drill the line set hole - Create a 3.5" hole angled slightly downward for drainage
- Connect the components - Run refrigerant lines, electrical wiring, and drain tubing
- Test and seal - Check for leaks, release refrigerant, and seal wall penetration
The appeal of DIY mini split installation is clear from the research: while professional installation can be expensive, DIY systems come pre-charged with refrigerant and include quick-connect line sets. As one experienced installer noted, "A mini split is 2 hours with a helper max" for the basic installation.
However, most mini split failures are due to installation errors, making proper technique crucial. Indoor units typically weigh 40-50 pounds, while outdoor condensers weigh around 80 pounds, requiring careful handling and proper support.
The key advantage of mini splits is their simplicity compared to traditional systems. They require only a small hole through your wall instead of extensive ductwork, and modern DIY kits eliminate the need for professional refrigerant charging.

Preparation: Planning Your Installation
Before starting your mini split installation, careful planning is key. This ensures you choose the right system and prepare your space for a smooth setup.
Mini-split systems come in a few varieties, primarily categorized by how many indoor units they support:
- Single-zone systems: These are designed to heat or cool one specific area, like a single room, an addition, or a garage. They consist of one indoor air handler connected to one outdoor condenser unit. These are generally the simplest for DIY mini split installation.
- Multi-zone systems: These systems allow you to connect two or more indoor air handlers to a single outdoor condenser. This is ideal for controlling temperatures independently in different rooms or zones of your home. While more complex, they offer incredible flexibility.
Next, consider sizing. It’s crucial to select a unit with the correct British Thermal Unit (BTU) output for your space. An undersized unit won't be effective, while an oversized one can cycle too frequently, leading to inefficiency and discomfort. We recommend checking out our guide on What Size AC Unit Does Home Need for detailed calculations.
Choosing the right locations for your indoor and outdoor units is equally important for performance and aesthetics.
- Indoor Unit Placement: We typically recommend mounting the indoor unit high on a wall, ideally at least six feet from the floor or about 2.1 meters. This allows for optimal air distribution throughout the room. Try to pick an exterior wall, as this simplifies routing the line set outside. Avoid areas with direct sunlight or other heat sources that could interfere with the unit's temperature sensing. Ensure there's adequate clearance (6-12 inches) on each side and from the ceiling for proper airflow and maintenance. For more insights, refer to our tips on Best Locations for Heat Pump Placement.
- Outdoor Unit Placement: The outdoor condenser unit needs a spot with good airflow, ideally with at least 12 inches of clearance on all sides. Placing it on the east or north side of your home can maximize cooling efficiency by keeping it out of direct afternoon sun. Keep it away from bedrooms or quiet areas to minimize noise, as the unit weighs about 80 pounds and can vibrate. It should be on a level surface, often a concrete pad, to ensure stability.
Safety is paramount during any mini split installation. Always turn off power to the work area before dealing with electrical connections. If you're not comfortable with electrical work, hire a licensed electrician. Lifting heavy components like the 40-50 lb indoor unit and 80 lb outdoor unit requires care, and it's always safer with a helper. Wear gloves and safety glasses to protect yourself.
Essential Tools and Materials
Having the right tools on hand is key for a successful mini split installation. Here’s what you'll need:
- Drill: A powerful drill is essential for various tasks, including drilling pilot holes and the main line set hole.
- Hole Saw (3.5"): This specific size is commonly needed for drilling the hole through your wall to accommodate the line set.
- Level: Crucial for ensuring both your indoor and outdoor units are perfectly level, which is vital for proper drainage and operation. A magnetic I-beam level can be very helpful.
- Stud Finder: To locate wall studs for securely mounting the indoor unit's bracket.
- Wrenches (including Torque Wrench): You'll need adjustable wrenches for tightening connections. A torque wrench is critical for ensuring refrigerant line connections are tightened to the manufacturer's precise specifications, preventing leaks.
- Screwdrivers: For various fasteners.
- Utility Knife: For cutting insulation, tape, and other materials.
- Caulk/Sealant: To seal the wall penetration after running the line set, preventing drafts and moisture intrusion. Geocell tri-polymer sealant or low-pressure foaming sealant are good options.
- Line Set Cover: These protective channels cover the exterior refrigerant lines and electrical wiring, providing a clean, professional finish and protecting the lines from weather and damage.
- Additional Items: You might also need electrical tape, PVC pipe (for wall sleeve), a concrete pad (if not wall-mounting the outdoor unit), and rubber pads (to reduce outdoor unit vibration).

The Step-by-Step Mini Split Installation Guide
Now that we've planned and gathered our tools, let's get to the hands-on part of your mini split installation. This section provides a detailed walkthrough for the physical placement and mounting of the main components.
Mounting the Indoor Air Handler
The indoor air handler is the part of your mini-split system that circulates conditioned air inside your home. Proper mounting is crucial for its performance and to prevent issues like water leaks.
- Locate the Mounting Plate: Your indoor unit will come with a metal mounting plate. This plate is what you'll attach to the wall first.
- Choose Your Spot: We've already picked the ideal location during planning (high on an exterior wall, away from heat sources, with proper clearances). Now, we need to ensure the wall itself is suitable.
- Locate Wall Studs: Use your stud finder to locate the wall studs. It's best practice to secure the mounting bracket directly to at least two studs for maximum stability. If hitting studs isn't possible, use heavy-duty hollow drywall anchors rated for the weight of the unit, but direct stud mounting is always preferred.
- Position and Level the Bracket: Hold the mounting plate against the wall in your chosen spot. Use your level to ensure it is perfectly horizontal. An air handler mounted out of level will not drain properly, leading to potential leaks and malfunction. Mark the drill points through the holes in the bracket.
- Secure the Bracket: Drill pilot holes at your marked points. Then, use appropriate screws (e.g., cabinet screws or lag screws with washers) to securely fasten the mounting plate to the wall. Double-check with your level after securing it.
- Quick tip: The indoor air-handling unit typically weighs between 40-50 lbs, so a secure mount is essential!

Drilling the Line Set Hole
This step creates the pathway for the refrigerant lines, electrical wiring, and condensate drain line to pass from the indoor unit to the outdoor unit. This is often described as the most stressful part of the DIY process, but with care, it's manageable.
- Choose the Spot: On the mounting plate, there will be a designated area or template indicating where the line set should exit the wall. This is usually behind the indoor unit.
- Drill a Pilot Hole: From inside, drill a small pilot hole through the wall at the center of your chosen line set exit point. This will help you verify the exact location on the outside and check for any hidden obstructions.
- Check for Obstructions: Before drilling the larger hole, use a metal probe or even a bent coat hanger through your pilot hole to check for any wires, pipes, or ducts inside the wall cavity. You definitely don't want to hit anything crucial!
- Using a Hole Saw: Attach your 3.5" hole saw bit to your drill. From the inside, carefully drill the main hole through your interior wall.
- Angling Downward for Drainage: Critically, drill the hole at a slight downward angle (e.g., 2-3 degrees) from the inside to the outside. This ensures proper gravity drainage for the condensate line and prevents water from entering your wall.
- Drill Exterior: Once you're through the interior wall, cut any insulation, and continue drilling through the exterior sheathing. If you have delicate siding, you can drill a smaller pilot hole from the inside out, then use the larger hole saw from the outside in to prevent cracking or splintering the siding. Drill in reverse initially to score the surface, then switch to forward.
- Wall Sleeve Installation (Optional but Recommended): Some kits include a plastic wall sleeve, or you can use a section of 2" PVC pipe. Insert this sleeve into the drilled hole. This protects the line set and provides a clean conduit.
Installing the Outdoor Condenser
The outdoor condenser unit is the powerhouse of your mini-split system. Proper placement and secure installation are vital for its longevity and efficient operation.
- Ground Pad vs. Wall Bracket: You have two main options for mounting the outdoor unit:
- Concrete Pad: The most common method is to place the unit on a dedicated concrete pad. This ensures a stable, level surface. You can purchase a pre-made pad or pour one yourself. If placing on the ground, ensure it's liftd (e.g., on concrete blocks) to prevent snow accumulation from blocking airflow.
- Wall Bracket: For areas with limited ground space or heavy snowfall, a wall-mounted bracket is an excellent alternative. We recommend using a sturdy bracket like the Optional Condenser Mounting Bracket. These brackets are designed to support the unit's weight and keep it off the ground.
- Ensuring a Level Surface: Regardless of whether you choose a pad or a bracket, the outdoor unit must be perfectly level. Use your level to confirm. This is important for the compressor's operation and proper oil return.
- Clearance Requirements: Ensure adequate clearance around the unit for proper airflow. Most manufacturers recommend at least 12 inches of clearance on all sides. For wall-mounted units, some, like MRCOOL, only require 6 inches of clearance behind the unit, but always check your specific model's manual. Insufficient clearance can cause the unit to overheat and may void your warranty.
- Mount the Unit: Carefully lift the outdoor unit onto the pad or bracket. This unit weighs about 80 pounds, so get a helper!
- Securing the Unit: Once positioned, secure the unit. If on a pad, use anchor bolts if recommended by the manufacturer. If on a wall bracket, fasten it securely to the bracket. Always use rubber pads under the unit to minimize vibration and noise.
Making the Connections and Finishing Up
With the indoor and outdoor units securely in place, the next crucial phase of your mini split installation involves connecting them. This section covers connecting the two units and finalizing the installation for a clean, professional look.
Running and Connecting the Line Set
The line set is the lifeline of your mini-split system, carrying refrigerant, electrical signals, and condensate drain water between the indoor and outdoor units. Most DIY-friendly mini-splits come with pre-charged quick-connect line sets, simplifying this step significantly.
- Bundling Lines: Take the refrigerant lines, control wires, and condensate drain tubing. Bundle them together neatly using electrical tape. Ensure the condensate drain line is at the bottom of the bundle to allow for proper gravity drainage.
- Feeding Lines Through the Wall: From inside, carefully feed the bundled line set through the hole you drilled earlier. Have a helper on the outside to gently pull and guide the lines. Ensure the plastic collar or wall sleeve stays in place within the hole.
- Bending Tubing Carefully: The refrigerant lines are copper and can kink if bent too sharply. Bend them slowly and gently to guide them from the indoor unit's connection points through the wall and down towards the outdoor unit. Avoid sharp 90-degree bends. If you have excess line set length (common with pre-charged kits), coil it horizontally next to the outdoor unit. Do not cut pre-charged lines unless you are a licensed HVAC professional, as this will release refrigerant and require professional vacuuming and charging.
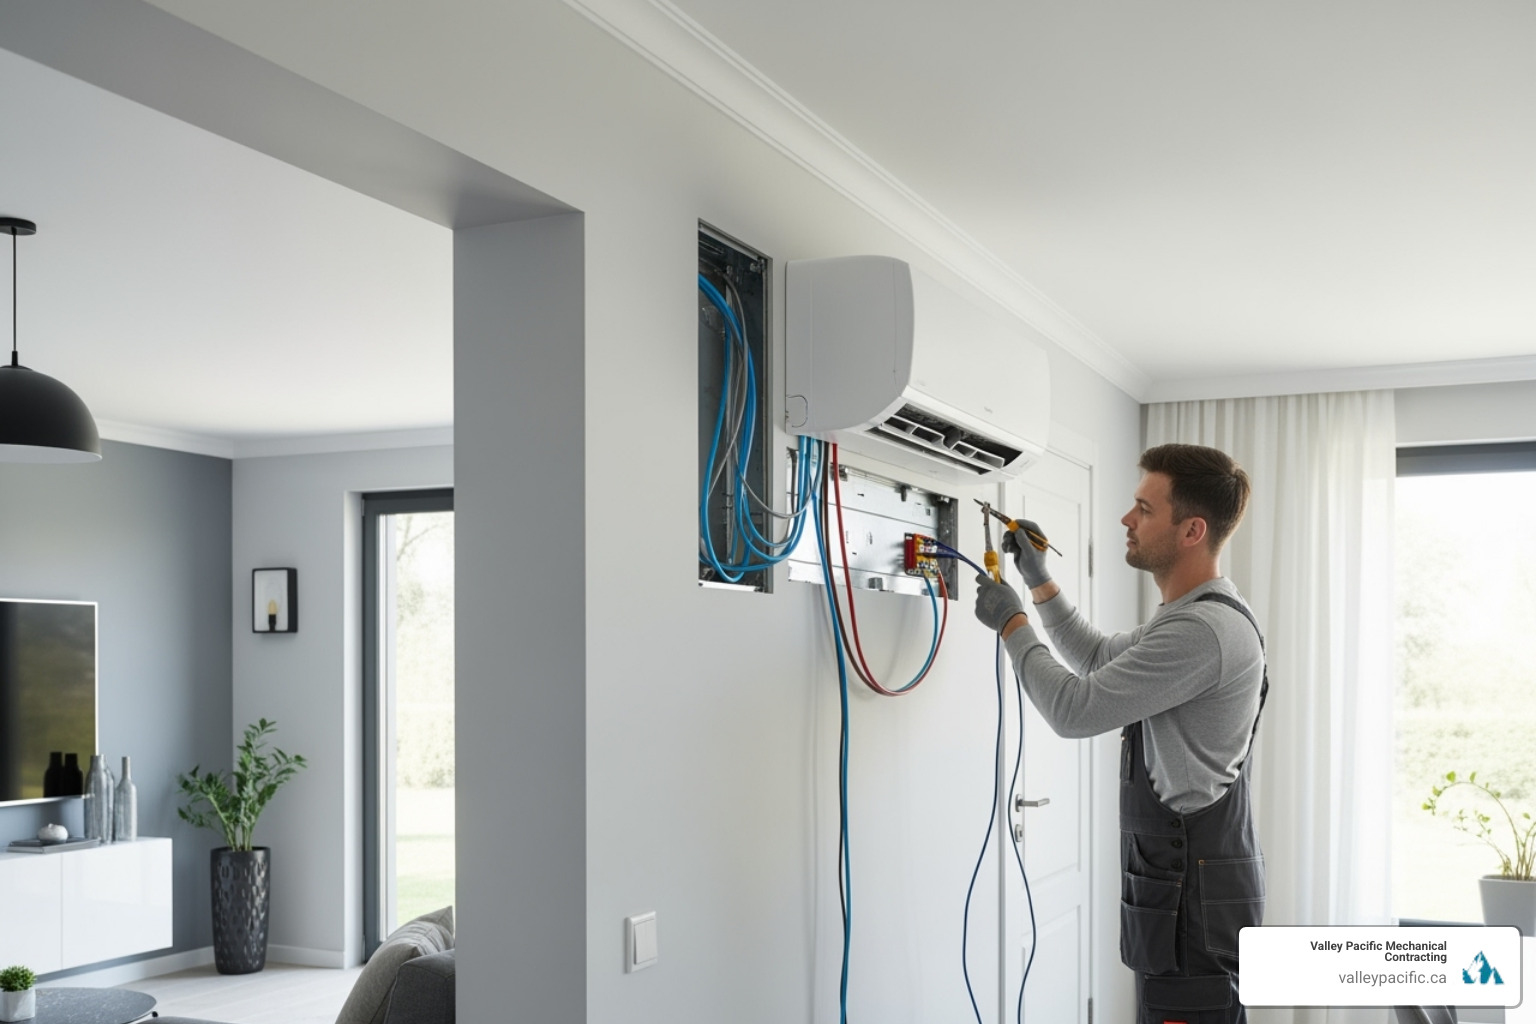
- Connecting to Indoor Unit: Inside, connect the refrigerant lines, control wires, and condensate drain to their respective ports on the back of the indoor unit. Follow your manufacturer's specific instructions for these connections.
- Connecting to Outdoor Unit: Outside, connect the other end of the line set to the outdoor condenser unit. For quick-connect systems, this usually involves aligning the connectors and tightening them. For traditional flare connections (less common in DIY kits), you'll need to deburr the copper tubing, create a perfect flare, and then connect the lines.
- Using a Torque Wrench for Flare Nuts: If your system uses flare nuts, it's absolutely critical to tighten them to the manufacturer's specified torque values using a torque wrench. Under-tightening can lead to refrigerant leaks, while over-tightening can damage the flare or the valve, also causing leaks. For example, some common torque specifications are 11.8 ft/lbs for 1/4” tubing and 19 ft/lbs for 3/8” tubing.
- Final Indoor Unit Placement: Once the connections are made, carefully lift the indoor unit onto its mounting bracket. It should click or lock securely into place. Ensure it sits flush against the wall and is still level.
For more general guidance on connecting components, you can also refer to resources like How to Install a Mini-Split Air Conditioner.
Making the Electrical and Drain Connections
These connections are vital for your system's operation and safety.
- Safety Warning: Turn Off Power! Before touching any electrical wiring, ensure the power to the circuit you're working on is completely off at your home's main breaker panel.
- Connecting Control Wires: These low-voltage wires transmit signals between your indoor and outdoor units. Connect them according to the wiring diagram in your mini-split's manual. There will typically be labeled terminals on both units.
- Connecting Power Wires: Most mini-split systems require a dedicated 20-amp circuit. This means the unit needs its own circuit breaker in your electrical panel and a dedicated line running to the outdoor unit. For safety and compliance with local electrical codes, we strongly recommend hiring a licensed electrician for this step if you are not qualified. Improper electrical work is dangerous and can void warranties or lead to system failure.
- Connecting the Condensate Drain Line: The indoor unit produces condensation (water) during operation. The drain line carries this water away. Connect the drain line from the indoor unit, ensuring it has a continuous downward slope to allow gravity to drain the water away from your home's foundation. It should terminate in an appropriate drainage point, like a French drain, a designated condensate drain, or away from the house. If your indoor unit is not on an exterior wall or cannot use gravity drainage, you may need a condensate removal pump.
Testing, Sealing, and Finishing Touches
We're almost there! These final steps ensure your system is working correctly, is sealed against the elements, and looks professionally installed.
- Leak Testing (Refrigerant Lines): Even with pre-charged systems, it's wise to check for leaks at all refrigerant line connections. Mix a solution of soapy water (or use a specialized bubble leak detector like 'Big Blu'). Spray it generously over all connection points on both the indoor and outdoor units. If you see any bubbles forming, you have a leak. Tighten the connection slightly and re-test until no bubbles appear.
- Releasing Refrigerant: For DIY pre-charged systems, this involves opening the service valves on the outdoor unit. Use a hex wrench to slowly turn the valves counter-clockwise until they are fully open. You might hear a slight hiss as the refrigerant equalizes pressure throughout the system.
- Power Up and Test: Once everything is connected and sealed, turn the power back on at the breaker panel. Power up your mini-split system. Test both heating and cooling functions to ensure it's operating correctly. Check the airflow, listen for unusual noises, and verify that the remote control and any Wi-Fi features are working.
- Sealing the Wall Penetration: Go back to the hole you drilled through the wall. From the outside, use caulk, sealant, or low-pressure foaming sealant to thoroughly seal around the line set where it exits the wall. This prevents air leaks, moisture intrusion, and pest entry. If you used a wall sleeve, seal around the sleeve as well.
- Installing a Line Set Cover: For a clean, protected finish, install a decorative Line Set Cover over the exterior refrigerant lines, electrical wiring, and drain line. These covers come in sections and can be screwed to your siding, protecting the lines from UV damage and physical impact. They are often paintable to match your home's exterior.

DIY Pitfalls and When to Hire a Professional
While the appeal of saving money on mini split installation by doing it yourself is strong, it's important to be aware of the potential challenges and when professional help is truly advisable.
| Feature | DIY Installation | Professional Installation |
|---|---|---|
| Warranty | Often voided if not installed by licensed professional | Typically maintained; provides peace of mind |
| Safety | Risks of electrical shock, refrigerant burns, injury | Ensured by trained technicians and proper equipment |
| Time | Can take a weekend or more for a handy homeowner | Usually completed in a few hours by experienced pros |
| Expertise | Requires significant research and attention to detail | Guaranteed by certified HVAC technicians |
| Tools | Requires purchase/rental of specialized tools | Technicians arrive with all necessary specialized tools |
| Permits | Homeowner responsible for obtaining permits/inspections | Professional handles necessary permits and inspections |
| Performance | Risk of reduced efficiency or early failure | Optimized performance and longevity |
Common DIY Mistakes
We've seen it all, and many mini-split failures stem from common DIY errors:
- Kinked Lines: Bending the copper refrigerant lines too sharply can cause kinks, restricting refrigerant flow and severely impacting performance. This damage is often irreparable without replacing the entire line set.
- Refrigerant Leaks: This is a big one. Improperly tightened flare connections (too loose or too tight), damaged flares, or incorrect vacuuming procedures (for non-DIY units) lead to refrigerant leaks. Refrigerant loss means your unit won't cool or heat effectively and can be harmful to the environment. Releasing refrigerant into the atmosphere can severely burn your skin.
- Improper Electrical Work: Incorrect wiring can damage the unit, pose fire hazards, or lead to electrical shock. Mini-splits require a dedicated circuit, and if you're not a licensed electrician, this step is best left to one.
- Improper Drainage: If the indoor unit isn't level or the drain line doesn't have a continuous downward slope, water can back up, leading to leaks inside your home.
- Poor Unit Placement: Ignoring clearance requirements for the outdoor unit can lead to overheating and reduced efficiency.
Warranty Considerations
This is a critical point. While DIY mini-split systems like MRCOOL are designed for self-installation, some manufacturers, even MRCOOL, may only honor their full warranty if the product was professionally installed by a licensed HVAC contractor. Always check the warranty terms before starting your mini split installation.
Benefits of Professional Service
When is it advisable to hire a professional?
- Complex Installations: For multi-zone systems, or if your home has unique structural challenges, a professional installation ensures all components are correctly integrated.
- Peace of Mind: Knowing your system is installed correctly, safely, and efficiently by experts provides invaluable peace of mind. Professionals ensure peak performance and longevity.
- Warranty Protection: As discussed, professional installation often ensures your manufacturer's warranty remains valid.
- Safety and Code Compliance: Licensed professionals are familiar with local building codes, electrical codes, and safety regulations, ensuring your installation is compliant and safe.
- Refrigerant Handling: For non-DIY pre-charged units, professionals have the specialized equipment to vacuum the lines and charge the system correctly, which is crucial for efficiency and avoiding leaks.
If you notice issues like unusual noises or poor performance after installation, these could be Signs your heat pump needs repair and a professional should be consulted.
Ongoing System Maintenance
Once your mini-split is installed, whether by you or a professional, regular maintenance is key to its efficiency and lifespan.
- Cleaning Air Filters: We recommend cleaning or replacing your indoor unit's air filters monthly, especially during peak usage seasons. Dirty filters restrict airflow, reduce efficiency, and can lead to system strain.
- Clearing Debris from Outdoor Unit: Keep the outdoor condenser unit clear of leaves, grass clippings, snow, and other debris. Obstructions can hinder airflow and reduce efficiency.
- Checking for Unusual Noises: Pay attention to any new or unusual sounds coming from either unit. These can be early indicators of a problem.
- Scheduling Annual Service: Just like a car, your mini-split benefits from professional tune-ups. We offer Comprehensive Heat Pump Service Plans that ensure your system is running optimally. Our experts can catch minor issues before they become major problems. For more tips on keeping your system in top shape, check out our Seasonal Heat Pump Maintenance Tips.
Conclusion
Starting on a DIY mini split installation can be a rewarding project, offering the satisfaction of personal accomplishment and the immediate benefits of improved home comfort and energy efficiency. We've walked through the planning, mounting, connecting, and finishing touches, highlighting the critical steps and common pitfalls.
While modern DIY mini-splits have made the process more accessible, it's clear that attention to detail, adherence to safety protocols, and understanding the system's requirements are paramount. The ability to control individual zones, eliminate bulky ductwork, and enjoy significant energy savings makes mini-splits an excellent choice for many homeowners.
However, for a truly guaranteed 'headache-free' experience and to protect your significant investment, professional installation remains the best choice. Our team at Valley Pacific Mechanical Contracting brings over 30 years of expertise to every mini split installation in the Lower Mainland, including Langley BC, Pitt Meadows BC, Maple Ridge BC, and Mission BC. We offer 24/7 emergency service and are committed to the Daikin Comfort Promise, ensuring your system is installed correctly and efficiently from day one.
If you're considering a mini-split system and prefer the peace of mind that comes with expert service, don't hesitate to reach out. We're here to help you achieve optimal home comfort. Learn more about our services or schedule a consultation for Heat Pump Installation Langley BC.


