


What to Do When Your AC Remote Stops Communicating with Your Mini-Split


Why Is My Ductless Mini-Split Ignoring the Remote?
Are you pressing the power button over and over, only to realize your system is completely ignoring you? Figuring out exactly what to do when your AC remote stops communicating with your mini-split is a frustrating experience, especially when the temperature inside your home is rapidly climbing and you are stuck on the wrong setting. The immediate panic is understandable, but an unresponsive system does not automatically mean your equipment is permanently broken.
At Valley Pacific Mechanical Contracting Ltd., we know firsthand that when dealing with unresponsive ductless mini-split systems, knowing how to safely troubleshoot the issue can save you time and frustration. However, if the problem lies deep within the electrical components, calling for professional HVAC repair is always the smartest next step. The core decision you face as a homeowner is determining whether this is a simple communication glitch—like dead batteries or a dusty sensor—or a complex internal motherboard failure that requires licensed diagnostics.
This guide provides a clear, step-by-step roadmap to safely troubleshoot ductless mini-split wall-mounted head units. By following these safe homeowner checks, you can rule out the most common minor faults without risking electrical injury or voiding your manufacturer warranty.
Understanding How Ductless Remotes Communicate
To effectively troubleshoot a communication failure, it helps to understand exactly how the technology works. Unlike modern smart home devices or garage door openers that use radio frequency (RF) or Wi-Fi signals to penetrate walls, most standard mini-split remotes rely on infrared (IR) light. This means the remote control must send an invisible beam of light directly to a small receiver eye located on the indoor unit.
During routine air conditioning services, our technicians at Valley Pacific Mechanical Contracting Ltd. frequently discover that an "unresponsive" system is actually just suffering from a blocked line of sight rather than a mechanical breakdown. If the infrared beam cannot reach the receiver, the ductless mini-split wall-mounted head units simply will not react to your commands.
The Line-of-Sight Requirement
Infrared signals travel in a strictly straight line. They cannot bend around corners, bounce effectively off heavily textured walls, or penetrate solid objects. Standard HVAC remotes usually have a maximum effective range of about 15 to 25 feet, provided there is a clear, unobstructed path between the remote in your hand and the receiver on the wall.
• Distance limitations: Standing too far away or trying to operate the unit from an adjacent hallway will cause the signal to drop off before reaching the sensor.
• Angle restrictions: Pointing the remote at a sharp angle rather than directly at the unit can prevent the receiver from catching the full infrared burst.
• Battery voltage impact: As batteries drain, the strength of the IR beam weakens, drastically reducing the effective range even before the digital display fades.
Common Signal Interferences
Even if you are standing directly in front of the unit, environmental factors can disrupt the infrared signal. Because the remote relies on light, other intense light sources or physical barriers can easily cause interference.
• Physical Obstructions — How It Blocks the Signal: Solid objects physically block the straight-line path of the IR beam. — Common Examples: Tall bookshelves, heavy curtains, indoor plants, or temporary room dividers.
• Light Interference — How It Blocks the Signal: Intense light washes out the receiver sensor, blinding it to the remote's beam. — Common Examples: Direct, bright sunlight hitting the indoor unit, or high-intensity halogen lighting.
• Electronic Interference — How It Blocks the Signal: Other devices emitting similar frequencies confuse the receiver board. — Common Examples: Certain older plasma televisions, faulty fluorescent light ballasts, or competing IR devices.
Step 1: Ruling Out the Remote Control Itself
Before assuming there is a major problem with the indoor head unit, the first step is always to verify that the remote control is actually transmitting a signal. Remotes are frequently dropped, exposed to moisture, or left with dying batteries, making them the most common culprit in communication failures.
Start by checking the remote's digital display. If the numbers are faded, completely blank, or displaying a strange error code, the remote itself is lacking sufficient power. Replace the batteries with fresh, high-quality alkaline batteries. It is important to note that a remote might still have enough battery power to display numbers on the LCD screen, but not enough voltage to push a strong infrared signal across the room.
The Smartphone Camera Trick
Because the human eye cannot see infrared light, it can be difficult to know if the remote is actually sending a command. Fortunately, the digital camera on your smartphone can "see" infrared light, making this a fast and highly effective diagnostic trick.
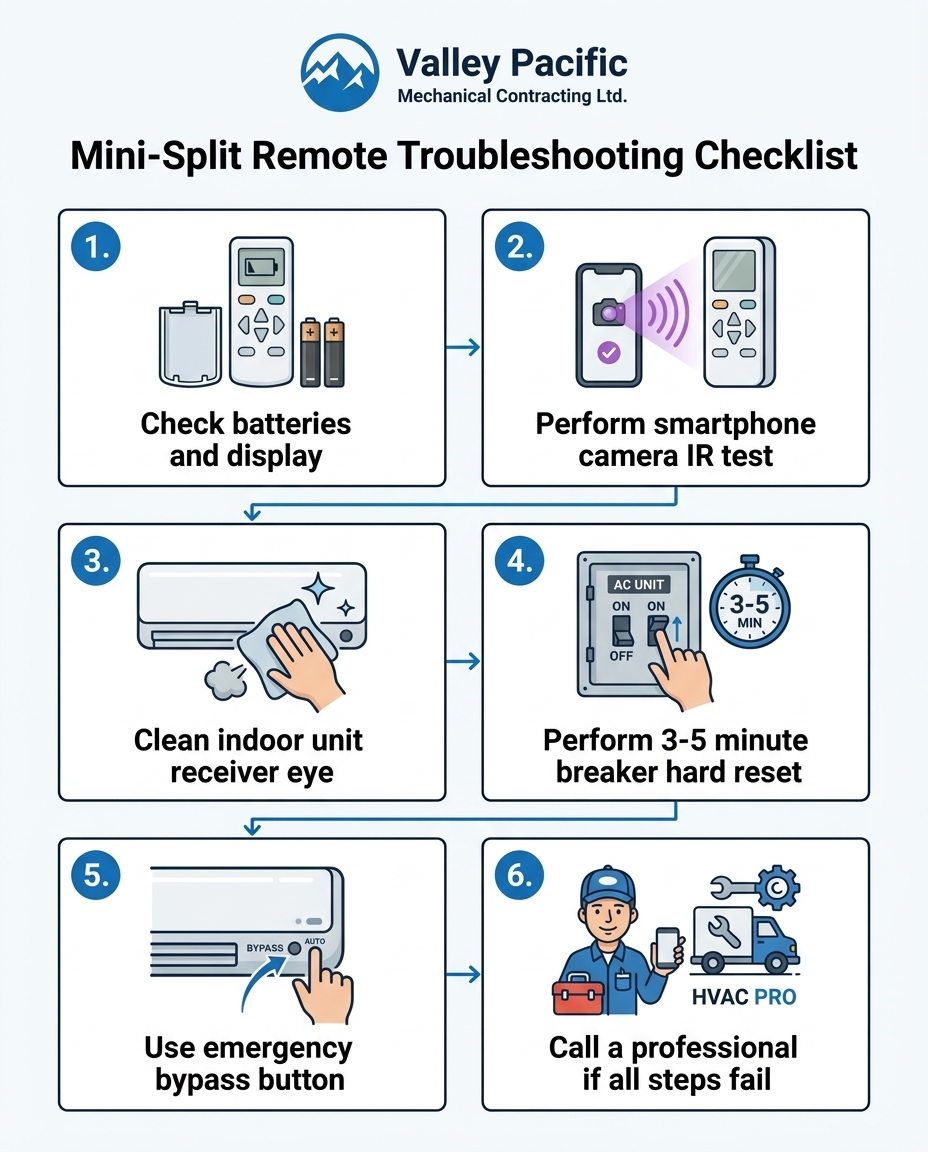
1. Open your camera app: Launch the standard camera application on your smartphone (the front-facing selfie camera often works best for this, as many rear cameras have strong IR filters).
2. Point the remote: Aim the top edge of the remote control (where the small LED bulb is located) directly at your phone's camera lens.
3. Press a button: Press and hold the power or temperature button on the remote while looking at your phone screen.
4. Look for the flash: If the remote is working correctly, you will see a faint purple, blue, or white flashing light on your phone screen coming from the remote's bulb.
If you see the light flashing on your screen but the air conditioner still ignores the command, the remote is functioning properly, and the issue lies with the indoor unit. If you do not see a light, double-check the batteries. If fresh batteries do not solve it, the remote control itself has likely failed and needs to be replaced. Additionally, check if your remote has a tiny pinhole "Reset" button on the back or under the battery cover; pressing this with a paperclip can sometimes clear a frozen remote display.
Step 2: Inspecting and Cleaning the Infrared Receiver Eye
If the remote is successfully emitting an infrared signal, the next logical step is to ensure the indoor unit is capable of receiving it. The receiver eye is a small, sensitive electronic component that must remain clean and unobstructed to function properly.
In our years of serving Maple Ridge BC, our team at Valley Pacific Mechanical Contracting Ltd. has seen how our warm, humid summers can significantly increase indoor condensation around cooling equipment. This excess moisture in the air often causes sticky dust, pet dander, and cooking grease to accumulate directly on the indoor unit's plastic casing. Over time, this forms a hazy film over the infrared receiver eye, physically blinding the sensor and blocking the remote's signal.
Locating the Sensor on the Wall Unit
Finding the receiver eye is usually straightforward, though its exact placement varies slightly by manufacturer.
• Check the display panel: The receiver is almost always located near the digital temperature display or the small LED indicator lights on the lower right or center of the front panel.
• Look for the dark window: It typically looks like a small, dark, semi-transparent plastic square or circle, roughly the size of a dime.
• Inspect for grime: Shine a flashlight on the area to see if there is a visible layer of dust, smudges, or cloudy buildup covering the plastic window.
Safe Cleaning Techniques
Cleaning the sensor requires a gentle touch to avoid scratching the plastic or pushing moisture into the sensitive electronics behind the panel.
1. Power down: Always turn the unit off using the manual button or the electrical breaker before cleaning.
2. Use a microfiber cloth: Take a clean, dry microfiber cloth and gently wipe the dark plastic window.
3. Dampen if necessary: If the grime is sticky, slightly dampen a corner of the cloth with plain water. Never spray water or chemical glass cleaners directly onto the unit, as harsh chemicals can permanently cloud the plastic lens or short out the receiver board.
4. Dry completely: Wipe the area with a dry section of the cloth to prevent water spots from forming.
Step 3: Performing a Safe Hard Reset at the Breaker
If the remote is sending a signal and the receiver eye is perfectly clean, the communication failure is likely a software glitch within the indoor unit's logic board. Just like a personal computer or a smartphone, the microprocessor inside a ductless mini-split can occasionally freeze or get caught in a logic loop, causing it to ignore all incoming commands.
As a local HVAC provider committed to transparency, the team at Valley Pacific Mechanical Contracting Ltd. always recommends homeowners try a safe, breaker-level hard reset first. Walking you through this simple procedure can potentially clear a temporary logic glitch and save you the cost of an unnecessary diagnostic service call. While this is a great troubleshooting step, ongoing electrical issues should be addressed during routine heat pump maintenance.
Why Logic Boards Freeze
Logic board glitches are relatively common and can be triggered by several factors. Brief power surges, micro-outages during a storm, or simply running the system continuously for weeks during a heatwave can cause the onboard memory to fault. When this happens, pressing the power button on the remote will do nothing, even if the unit beeps to acknowledge the signal.
To clear this fault, you must perform a "hard reboot" by completely draining the system's stored electricity. Simply turning the unit off with the manual button is not enough, as the internal capacitors still hold a small charge that keeps the frozen logic board awake.
How to perform a safe hard reset:
1. Locate your electrical panel: Find your home's main circuit breaker box.
2. Find the HVAC breaker: Look for the dedicated double-pole breaker labeled for your air conditioner, heat pump, or mini-split.
3. Switch it off: Flip the breaker to the "Off" position.
4. Wait 3 to 5 minutes: This waiting period is critical. It gives the internal capacitors inside the mini-split enough time to completely discharge, fully wiping the temporary memory faults.
5. Restore power: Flip the breaker back to the "On" position. Wait another 60 seconds for the system to boot up, then try using the remote control again.
How to Use the Emergency Bypass Button on the Indoor Unit
If you have worked through the troubleshooting steps and the system is still ignoring the remote, you do not have to suffer in an uncomfortable home while waiting for a technician. Most modern ductless mini-splits feature a hidden manual override button that allows you to force the system to turn on.
This emergency bypass is designed exactly for this scenario—when the remote is lost, broken, or suffering a communication failure. It provides immediate climate relief while you arrange for professional diagnostics.
Finding the Manual Switch
The emergency button is deliberately hidden so it is not accidentally pressed during routine cleaning. To access it, you will need to open the front cover of the indoor unit.
• Lift the front panel: Place your fingers under the small tabs on the bottom left and right sides of the main plastic cover. Gently pull forward and lift the panel upward. It should click and lock into an open position.
• Locate the button: Look on the right side of the unit, near the electrical housing. You are looking for a small, often recessed button labeled "Auto/Cool," "Emergency Operation," or simply "On/Off."
• Use a safe tool: Because the button is sometimes deeply recessed, you may need a non-conductive tool, like the eraser end of a pencil or a plastic pen cap, to safely press it.
Limitations of Auto Mode
While the emergency button is a lifesaver, it is strictly a temporary fix. Pressing this button usually forces the system into a pre-programmed "Auto" mode.
In this mode, the system defaults to a factory-set temperature (typically around 75°F or 24°C) and automatically selects the fan speed. You will not be able to adjust the temperature, change the fan speed, or switch between specific heating and cooling modes until the remote communication issue is permanently resolved.
When to Stop Troubleshooting and Call an Expert
There is a distinct line between safe homeowner troubleshooting and dangerous electrical work. If you have confirmed the remote is sending a signal via the camera test, cleaned the receiver eye, and performed a hard reset at the breaker, you have exhausted all safe DIY options. At this point, the failure is internal, and it is time to call a licensed technician.
Homeowners should never attempt to unscrew the indoor unit casing to inspect the receiver board, splice wires, or test electrical components. Doing so exposes you to high-voltage risks and will almost certainly void your manufacturer warranty.
Signs of Motherboard Failure
When the basic resets fail, a technician will need to evaluate the internal electronics. There are a few distinct symptoms that point directly to a failed receiver board or main control board:
• Unit beeps but does nothing — What It Likely Means: The receiver eye is catching the signal, but the main logic board is failing to execute the command.
• Complete unresponsiveness after reset — What It Likely Means: The receiver board itself has likely shorted out and is completely dead.
• Intermittent communication — What It Likely Means: Loose wiring harnesses between the receiver board and the main motherboard, often caused by vibration over time.
The Dangers of Internal Electrical Work
A licensed HVAC technician uses specialized multimeters to safely test voltage drops and communication lines between the boards. They can pinpoint exactly which circuit has failed without guessing. If the system is older and repair costs for proprietary circuit boards are mounting, it might be time to research mini-split installation options for a more reliable, energy-efficient replacement rather than pouring money into an aging system.
Frequently Asked Questions About Mini-Split Remotes
Why is my AC not responding to the remote?
If your AC is not responding to the remote, the most common culprit is dead batteries or a blocked infrared signal. The remote must have a clear line of sight to the indoor unit's receiver eye to function. If the batteries are fresh and the path is clear, the indoor unit's logic board may have frozen, requiring a hard reset at the electrical breaker to restore communication.
How do I reset my mini split remote?
To reset your mini-split remote, look for a small pinhole button labeled "Reset" on the back of the remote or inside the battery compartment. Use a paperclip or the tip of a pen to press and hold this button for three to five seconds until the digital display flashes. If your remote does not have a reset button, simply remove the batteries for five minutes to drain the residual power before reinstalling them.
Is there a reset button on a mini split indoor unit?
Most mini-split indoor units do not have a dedicated "reset" button for clearing logic faults. Instead, they have an emergency override button hidden under the front plastic panel, which forces the unit to turn on in an automatic mode. To actually reset the computer board inside the indoor unit, you must turn off the dedicated breaker in your home's electrical panel for three to five minutes.
How do you do a hard reset on a mini split?
A hard reset requires completely cutting the electrical power to the system to clear temporary memory faults. Locate the dedicated HVAC breaker in your main electrical panel and flip it to the "Off" position. Leave it off for at least three to five minutes to allow the internal capacitors to fully drain, then flip the breaker back on and wait one minute before testing the remote.
Can I use a universal remote if my ductless remote breaks?
Yes, universal mini-split remotes are widely available and can be programmed to work with most major ductless HVAC brands. However, universal remotes often only support basic functions like power, temperature control, and fan speed. You may lose access to brand-specific advanced features like specialized dehumidification modes, moving sensor tracking, or specific louver swing patterns.
What causes a mini-split receiver board to fail?
Receiver boards typically fail due to electrical power surges, prolonged exposure to high indoor humidity, or natural component degradation over time. Additionally, the constant vibration of the indoor blower wheel can sometimes cause the delicate wiring harnesses connecting the receiver board to the main motherboard to shake loose, severing the communication link.
Restore Your Home's Comfort with Expert Diagnostics
Dealing with a mini-split that refuses to communicate can disrupt your entire day, but identifying the root cause doesn't have to be a mystery. While dead batteries, blocked line-of-sight, and dusty sensors are incredibly common and easy to fix yourself, internal communication failures require a professional touch. Performing a safe hard reset at the breaker is the best way to rule out temporary glitches, but internal electrical faults should always be left to a licensed expert.
There is immense satisfaction in having a clear, definitive answer to your HVAC problem. If you have exhausted this safe DIY checklist and your system in Maple Ridge BC is still unresponsive, do not risk dangerous internal electrical work. Reach out to the experts at Valley Pacific Mechanical Contracting Ltd. to schedule a professional diagnostic inspection to safely restore reliable communication and get your home's comfort back on track.


