


How We Diagnose a Furnace That Suddenly Stops Working on the First Cold Night


When the Temperature Drops: Facing a Sudden Furnace Failure
When that first chilly September evening arrives in Maple Ridge BC, you might find yourself wondering exactly how we diagnose a furnace that suddenly stops working on the first cold night. At Valley Pacific Mechanical Contracting Ltd., we know this is a frustrating scenario: you walk over to the thermostat, switch the system from cooling to heating, and wait for that familiar rush of warm air. Instead, you hear a faint click, a brief hum, and then nothing but silence. The house remains stubbornly cold, and panic starts to set in as you wonder if your entire heating system needs to be replaced.
Dormant heating systems face unique physical stresses when they are suddenly asked to perform after months of sitting idle. While feeling anxious is completely natural, our team typically sees that a sudden failure rarely means the system is beyond repair. Professional technicians do not rely on guesswork when they arrive at your home. Instead, we approach these failures as a strict, methodical science, following a precise sequence of operations to pinpoint the exact failure. If you want to understand how your system operates, learning about furnace heating systems is a great place to start, and when things go wrong, securing professional furnace repair ensures the problem is solved safely and accurately.
The Hidden Impact of Summer Dormancy on Heating Systems
To understand why your furnace failed on that specific first chilly September evening, we have to look at what happened during the months it sat completely unused. A furnace does not exist in a vacuum. It sits in your basement, crawlspace, or utility closet, exposed to the ambient environment of your home all summer long. In our years of serving the Lower Mainland, the experts at Valley Pacific Mechanical Contracting Ltd. have seen firsthand how coastal humidity plays a major role in how mechanical systems age while dormant.
The Coastal Humidity Factor
Throughout the summer, moist coastal air circulates through your home and settles into the metallic components of your heating system. Because the furnace isn't firing up and burning off that moisture, condensation can begin to take a toll. This subtle degradation accelerates oxidation on delicate electronic parts and causes mechanical lubricants to settle or stiffen. By the time you finally ask the system to turn on, these minor environmental impacts can prevent the furnace from completing its startup sequence.
A proper diagnostic visit must rule out these environmental factors before we assume a catastrophic failure has occurred. Below is a breakdown of how summer dormancy typically affects specific components:
• Flame Sensor — Impact of Summer Dormancy: Oxidation and microscopic rust buildup from ambient humidity. — Symptom on the First Cold Night: Furnace fires up for a few seconds, then immediately shuts down.
• Inducer Motor — Impact of Summer Dormancy: Lubrication settles; bearings become stiff from lack of movement. — Symptom on the First Cold Night: A loud humming noise, or the system fails to start the exhaust fan.
• Venting / Flue — Impact of Summer Dormancy: Spiders, birds, or debris block the exhaust pipe over the summer. — Symptom on the First Cold Night: The pressure switch refuses to close, halting the entire startup process.
• Thermostat Contacts — Impact of Summer Dormancy: Dust accumulation on the internal relays or low batteries. — Symptom on the First Cold Night: The screen is blank, or the furnace never receives the signal to start.
By understanding these hidden impacts, our technicians know exactly what to look for when we open up the cabinet.
Step 1: Tracing the 'Call for Heat' from the Thermostat
Every proper furnace diagnostic begins outside of the furnace itself. We start at the thermostat, because if the brain of your heating system is not communicating properly, the furnace will never even attempt to turn on. We call this initial communication the "call for heat."
Testing the Low-Voltage Signal
1. Verifying the thermostat settings: We first ensure the thermostat is set to "heat" and the setpoint is higher than the current room temperature.
2. Checking the battery power: If the thermostat relies on batteries, we test their voltage. Weak batteries can cause erratic signals.
3. Measuring the control wire voltage: Our technicians use a multimeter to check for a 24-volt signal traveling from the thermostat down to the furnace control board. If that voltage is missing, the problem is in the wiring or the thermostat, not the mechanical components of the furnace.
Decoding the Control Board
1. Accessing the lower cabinet: We remove the furnace door and locate the main printed circuit board.
2. Reading diagnostic fault codes: Modern furnaces have a small LED light on the control board that flashes a specific sequence when an error occurs. We count these flashes and cross-reference them with the manufacturer's diagnostic manual.
3. Testing the board's output: We verify that the board is actually receiving the thermostat's signal and attempting to pass it along to the next component.
Ruling out communication errors right at the start prevents unnecessary mechanical replacements. If we discover a failing furnace control board, we can address it before tearing down the rest of the unit.
Step 2: Proving Safe Exhaust with the Inducer Motor and Pressure Switch
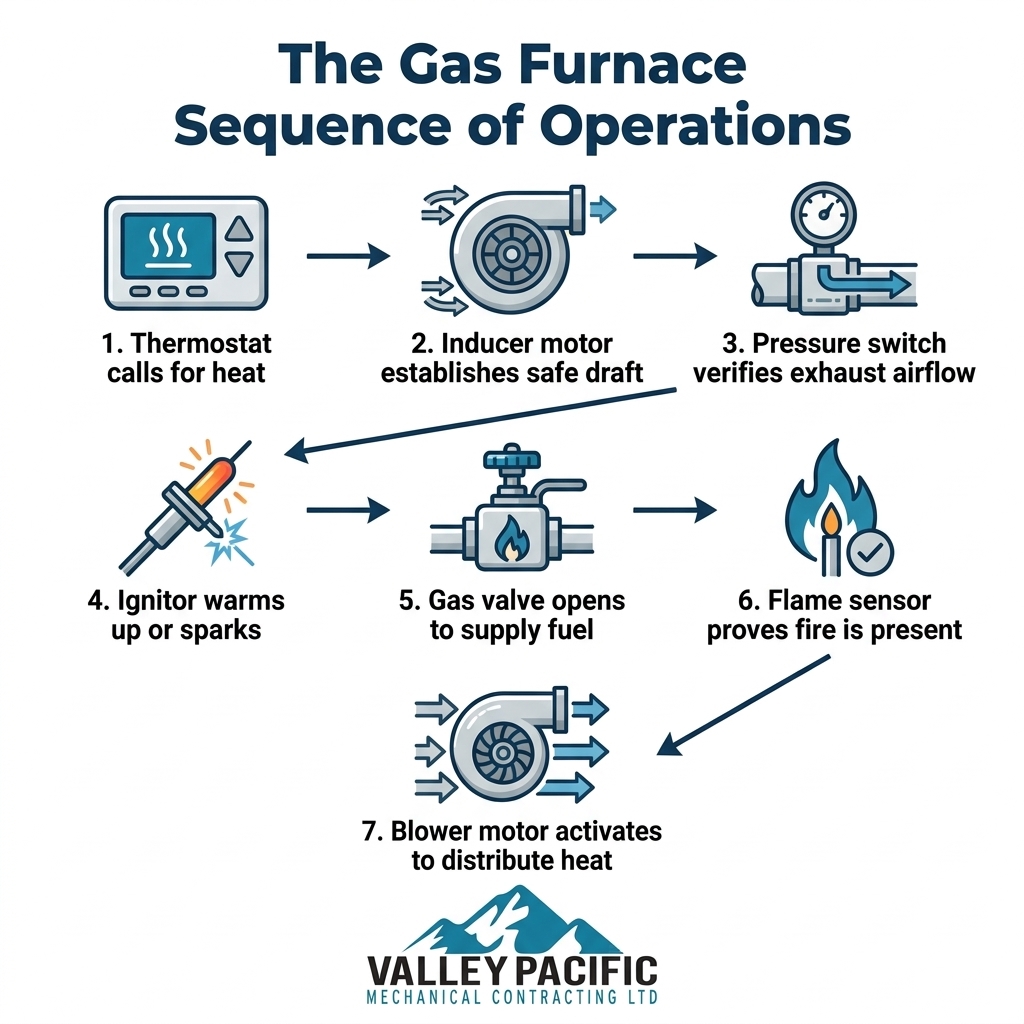
Once the control board receives the call for heat, it initiates the first critical safety step. Before any gas is allowed into the combustion chamber, the furnace must prove that toxic exhaust gases (like carbon monoxide) have a clear path out of your home.
The Role of the Inducer Draft Motor
1. Activating the exhaust fan: The control board sends 120 volts to the inducer draft motor. This small fan sits near the top of the furnace.
2. Clearing residual gases: The inducer motor runs for 30 to 60 seconds to push out any leftover gases from the previous cycle and establish a strong draft up the flue pipe.
3. Checking for mechanical stiffness: Because this motor sits idle all summer, our technicians listen for grinding bearings or test the motor's electrical draw to ensure it isn't struggling to spin.
The Pressure Switch Safety Gate
1. Sensing the negative pressure: As the inducer motor spins, it creates a vacuum. A small rubber tube connects the inducer housing to the pressure switch.
2. Closing the electrical circuit: If the vacuum is strong enough, it pulls a small diaphragm inside the pressure switch, closing an electrical contact and telling the control board it is safe to proceed.
3. Testing for blockages: If the pressure switch refuses to close, the sequence stops immediately. Our technicians will then inspect the flue pipe for bird nests or debris, and test the switch itself with a manometer to ensure it is calibrated correctly.
The pressure switch acts as a strict safety gatekeeper. If it doesn't sense proper draft, your furnace will intentionally lock itself out to protect your family.
Step 3: The Ignition Sequence and Gas Valve Operation
With a safe exhaust path proven, the furnace is finally ready to introduce fuel and create a flame. This step requires precise timing, and our technicians monitor it closely with specialized meters.
Activating the Ignitor
1. Powering the ignition source: Depending on the age of your furnace, the control board will either send voltage to a hot surface ignitor (which glows bright orange like a toaster element) or a spark ignitor (which clicks rapidly).
2. Measuring resistance: Ignitors become brittle over time. We measure the electrical resistance (ohms) of the ignitor to determine if it is weak and prone to failing in the middle of winter.
3. Waiting for the warmup period: The board allows a hot surface ignitor to glow for several seconds to reach the proper temperature before releasing any gas.
Opening the Gas Valve
1. Commanding fuel delivery: Exactly when the ignitor is at peak heat, the control board sends 24 volts to the gas valve.
2. Testing voltage at the valve: Our technicians use a multimeter to verify the valve is actually receiving this voltage. If the voltage is present but the valve doesn't click open, we know the internal solenoid is stuck or damaged.
3. Listening for ignition: We listen for the distinct "whoosh" of the burners lighting across the heat exchanger.
During these sequence checks, we often uncover deeper issues that aren't immediately obvious to the homeowner. For example, one Maple Ridge customer recently reached out to Valley Pacific Mechanical Contracting Ltd. for routine service in the spring. While methodically testing their sequence of operations, our team discovered a dangerous cracked heat exchanger that was preventing safe combustion. Because we caught it during a controlled test, we were able to safely shut the system down and replace the furnace before it became a winter emergency.
Step 4: Verifying the Fire with the Flame Sensor
One of the most common failure points we see on the first chilly September evening in Maple Ridge BC involves a furnace that ignites perfectly, runs for three seconds, and then abruptly shuts off. This is almost always related to the flame sensor.
The Crucial Role of the Flame Sensor
1. Proving the flame exists: Once the gas valve opens and the burners ignite, the furnace needs a way to verify that the fire is actually burning. If the burners fail to light, the gas valve must close immediately so raw gas doesn't flood your home.
2. Sitting in the fire: The flame sensor is a thin metal rod that sits directly in the path of the burner flame.
3. Detecting the current: The control board sends a tiny alternating current (AC) to the sensor. When the flame hits the rod, the fire itself acts as a conductor, converting that signal into a direct current (DC) that travels back to the board.
Measuring Microamps
1. Connecting the meter in series: Our technicians do not just guess if a sensor is bad. We connect a multimeter in series with the flame sensor wire.
2. Reading the microamp draw: We measure the exact microamps the sensor is producing. A healthy sensor usually reads between 2 and 4 microamps.
3. Identifying oxidation: If the reading drops below 1 microamp, the board will shut the gas valve off. This low reading usually means coastal humidity has caused an invisible layer of oxidation to form on the rod during the summer.
If we detect low microamps, our technicians will carefully clean the sensor with specialized abrasive pads and retest the system to ensure it holds a steady flame.
Step 5: Heat Distribution and Blower Motor Activation
The burners are lit, the flame sensor is happy, and the furnace is generating heat. But that heat is still trapped inside the metal cabinet. The final step in the sequence of operations is pushing that warmth into your living space.
The Heat Exchanger Delay
1. Allowing the metal to warm up: You may notice that your furnace blower doesn't turn on the exact second the burners light. The control board has a built-in time delay (usually 30 to 60 seconds).
2. Preventing cold drafts: This delay allows the heat exchanger to get hot. If the blower turned on immediately, it would blast cold, stagnant air through your vents before the heat had a chance to build up.
3. Activating the main blower: Once the delay finishes, the board sends 120 volts to the main blower motor, which pushes air over the hot heat exchanger and into your ductwork.
Verifying Safe Airflow
1. Checking the limit switches: As the blower runs, our technicians monitor the high-limit switch. This safety device ensures the furnace doesn't overheat. If airflow is restricted by a dirty filter, the limit switch will trip and shut down the burners.
2. Testing the temperature rise: We measure the temperature of the air entering the furnace and the air leaving the furnace. This "temperature rise" must fall within the manufacturer's specified range.
3. Confirming steady operation: A successful sequence ends with steady, warm air circulating through the vents without the system short-cycling or overheating.
Why Methodical Diagnostics Eliminate 'Parts-Cannon' Guesswork
When you hire a professional, you are paying for technical expertise, not guesswork. A strict sequence-of-operations diagnostic is the exact opposite of the dangerous and expensive "parts-cannon" approach. The parts-cannon method happens when an untrained individual simply guesses what is wrong and starts replacing parts one by one until the system finally turns on. This wastes your time, inflates the bill, and often leaves the root cause completely unresolved.
The Value of Transparency
In our experience, over 75% of "no heat" calls on the first cold night are related to safety lockouts in this sequence, not total mechanical destruction. By walking you through this exact process, we ensure you understand the value of the service call and trust the recommended solution. We measure voltage, we test microamps, and we check vacuum pressure. This methodical approach ensures the root cause is fixed, keeping the system reliable for the rest of the winter.
During a busy fall season, one local customer needed reliable and skilled professionals to evaluate their aging heating system. Because our Valley Pacific Mechanical Contracting Ltd. technicians provided expert, methodical service and clearly explained our diagnostic steps, they noted that we became their top choice for all future heating needs. It is this commitment to transparency that makes routine HVAC maintenance and diagnostic visits so valuable. We don't just clear an error code; we prove the system is safe to run.
Restoring Your Comfort with Precision and Care
A sudden furnace failure can disrupt your evening, but understanding how we diagnose a furnace that suddenly stops working on the first cold night should give you peace of mind. A methodical approach guarantees safety and accuracy, ensuring that a simple oxidized flame sensor isn't misdiagnosed as a catastrophic failure.
We strongly encourage homeowners to rely on professional diagnostics rather than DIY attempts when the sequence fails. Modern furnaces are complex pieces of equipment with strict safety tolerances. If your heating system refuses to wake up from its summer slumber, reach out to our team at Valley Pacific Mechanical Contracting Ltd. to schedule a thorough diagnostic check so we can restore your comfort safely.
Frequently Asked Questions
What is the sequence of operation for a gas furnace?
The sequence of operation is the strict, step-by-step process a furnace follows to start safely. It begins with the thermostat calling for heat, followed by the inducer motor clearing exhaust gases. The pressure switch then verifies airflow, the ignitor warms up, the gas valve opens, the flame sensor proves the fire, and finally, the blower motor pushes heat into the home.
Why won't my furnace kick on when the temperature suddenly drops?
A furnace that refuses to start after a long summer dormancy is often locked out by a safety switch. Common culprits include a stuck inducer motor, dust on the thermostat contacts, or a blocked exhaust vent. Because the system hasn't run in months, these minor issues prevent the initial sequence of operations from completing.
What exactly do HVAC technicians check during a furnace service call?
Technicians check the electrical and mechanical function of every component in the startup sequence. We measure voltage from the thermostat, test the vacuum pressure of the inducer motor, check the resistance of the ignitor, and read the microamps of the flame sensor. We also verify that the heat exchanger is intact and the limit switches are functioning properly.
Why does my furnace ignite and then shut off after just a few seconds?
This symptom is almost always caused by a dirty or failing flame sensor. The furnace successfully lights the burners, but the sensor fails to detect the fire due to oxidation or soot buildup. To prevent raw gas from flooding the home, the control board immediately shuts the gas valve off as a safety precaution.
Can high summer humidity affect my furnace before winter starts?
Yes, coastal humidity can significantly affect a dormant furnace. Moisture in the air can settle on delicate metal components, causing microscopic rust or oxidation on parts like the flame sensor and control board relays. This is why many systems fail to start on the very first cold night of the season.
How long does a professional furnace diagnostic typically take?
A thorough, methodical diagnostic usually takes between 45 minutes to an hour. This allows the technician enough time to test the electrical signals, measure component performance, and observe the furnace through multiple heating cycles. Rushing this process often leads to misdiagnosis and unnecessary part replacements.


